

Are you searching for – Microsoft Word Latest Tutorial 2019
Then you are at Right Place.
The Complete and Official Information of Microsoft Word Latest Tutorial 2019
Microsoft Word Latest Tutorial 2019
What is Microsoft Word
Microsoft Word is word processing software. It is developed by Microsoft and is part of Microsoft Office Suite. It enables you to create, edit and save professional documents like letters and reports.
History of Microsoft Word
Microsoft word was released in 1983 as Multi-Tool Word. Its first version was based on the framework of Bravo which was world’s first graphical writing program.
Microsoft renamed Multi Tool Word to Microsoft Word, and then in October 1983, Microsoft released its first version for the IBM PC.
In 1985, Microsoft ported it to the Macintosh which was different from its DOS-based counterpart, i.e. Macintosh offered various major interface changes.
In 1989, Microsoft released a new version of Word for its Windows operating systems. It was the Microsoft Word who introduced the concept of WYSIWYG (What You See Is What You Get), i.e. it allowed to create and display bold and italics text.
In 2014, Microsoft developed the source code for Microsoft Word for Windows 1.1a.
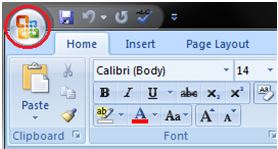
Microsoft Office Button
Microsoft Office Button is located on the top left corner of the window.It is a new user interface feature that replaced the traditional “File” menu. You can also see this button in Outlook while creating a new message, task, contact, etc.
See the image:
When you click the button it offers a list of commands to perform different tasks which are New, Open, Save, Save As, Print, Prepare, Send, Publish and Close. These commands are described below the following image.
See the image:
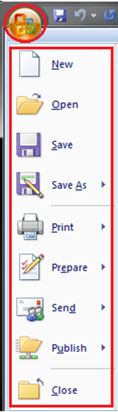
New: This command enables you create a new file, i.e. Word document.
Open: This command allows you to open an existing file on the computer.
Save: This command is used to save a file after completing the work. You can also save the changes made to the currently open file.
Save As: This command helps you save a new file with a desired file name to a desired location on the hard drive.
Print: This command is used to print a hard copy of the currently open document.
Prepare: This command allows you to prepare the document for distribution, i.e. you can view and edit the document properties and inspect the hidden metadata.
Send:This command allows you share the document with other users, i.e. you can send a document through e-mail or by posting to a blog.
Publish: This command allows you distribute the document to other people, i.e. you can create a blog with the content of the document.
Close: This command is used to close the currently open file.
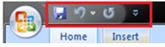
Quick Access Toolbar
Quick Access Toolbar lies next to the Microsoft Office Button. It is a customizable toolbar that comes with a set of independent commands. It gives you quick access to commonly used commands such as Save, Undo, Redo, etc.
See the image:
When you click the drop-down arrow next to toolbar it offers more commands. With a left click you can add any of these commands to Quick Access Toolbar. You can also remove the commands added to the tool bar. The indent, spacing values, individual styles and other features that appear on the ribbon cannot be added to quick access toolbar. The following image is showing the menu of quick access toolbar.
See the image:

Title Bar
It lies next to the Quick Access Toolbar. It displays the title of the currently open document or application. It is present on almost all windows displayed on your computer. So, if there are several windows across the screen, you can identify each window by looking at the title bar. In many graphical user interfaces, you can also move a window by dragging the title bar.
See the image:

Ribbon and Tabs
The Ribbon is a user interface element which was introduced by Microsoft in Microsoft Office 2007. It is located below the Quick Access Toolbar and the Title Bar. It comprises seven tabs; Home, Insert, Page layout, References, Mailing, Review and View. Each tab has specific groups of related commands. It gives you quick access to the commonly used commands that you need to complete a task.
See the image:

Home tab:
The Home tab is the default tab in Microsoft Word. It has five groups of related commands; Clipboard, Font, Paragraph, Styles and Editing. It helps you change document settings like font size, adding bullets, adjusting styles and many other common features. It also helps you to return to the home section of the document.
See the image:

Insert tab:
Insert Tab is the second tab in the Ribbon. As the name suggests, it is used to insert or add extra features in your document. It is commonly used to add tables, pictures, clip art, shapes, page number, etc. The Insert tab has seven groups of related commands; Pages, Tables, Illustrations, Links, Header & Footer, Text and Symbols.
See the image:

Page Layout tab:
It is the third tab in the Ribbon. This tab allows you to control the look and feel of your document, i.e. you can change the page size, margins, line spacing, indentation, documentation orientation, etc. The Page Layout tab has five groups of related commands; Themes, Page Setup, Page Background, Paragraph and Arrange.
See the image:

References tab:
It is the fourth tab in the Ribbon. It allows you to enter document sources, citations, bibliography commands, etc. It also offers commands to create a table of contents, an index, table of contents and table of authorities. The References tab has six groups of related commands; Table of Contents, Footnotes, Citations & Bibliography, Captions, Index and Table of Authorities.
See the image:

Mailings tab:
It is the fifth tab in the ribbon. It is the least-often used tab of all the tabs available in the Ribbon. It allows you merge emails, writing and inserting different fields, preview results and convert a file into a PDF format. The Mailings tab has five groups of related commands; Create, Start Mail Merge, Write & Insert Fields, Preview Results and Finish.
See the image:

Review tab:
It is the sixth tab in the Ribbon. This tab offers you some important commands to modify your document. It helps you proofread your content, to add or remove comments, track changes, etc. The Review tab has six groups of related commands; Proofing, Comments, Tracking, Changes, Compare and Protect.
See the image:

View tab:
The View tab is located next to the Review tab. This tab allows you to switch between Single Page and Two Page views. It also enables you to control various layout tools like boundaries, guides, rulers. Its primary purpose is to offers you different ways to view your document. The View tab has five groups of related commands; Document Views, Show/Hide, Zoom, Window and Macros.
See the image:

Ruler
The Ruler is located below the Ribbon around the edge of the document. It is used to change the format of the document, i.e. it helps you align the text, tables, graphics and other elements of your document. It uses inches or centimeters as the measurements unit and gives you an idea about the size of the document.
See the image:

Features of Microsoft Word you Should be Using
- How About Checking Your Spelling?
- Utilizing The Benefits Of Mail Merge
- Find & Replace
- Inserting Watermarks
- Inserting Your Header & Footer
- Using Hyperlinks Strategically
Thanks to Beloved Readers.